Merry Christmas to those following me and all the home brewers out there. I had a wonderful Christmas with friends and family and received some nice gifts.
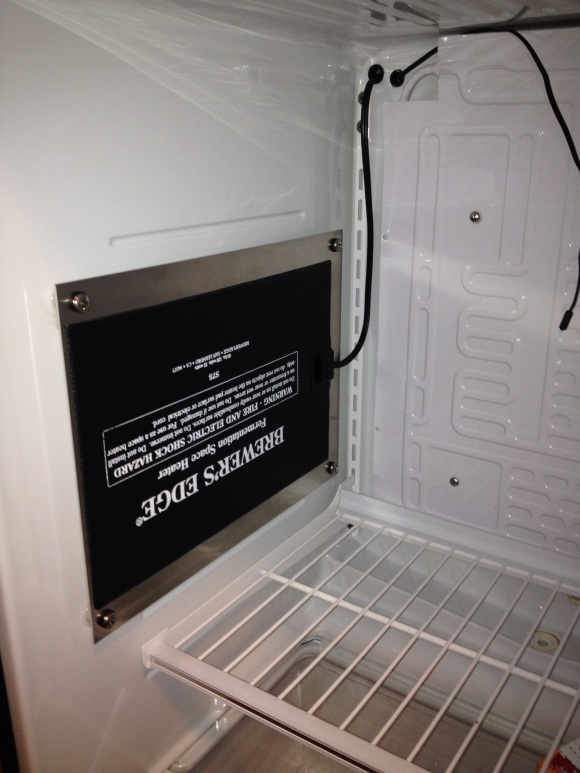
This last month has been a busy one with Christmas shopping but I was able to get my fermentation fridge finished by adding a Brewer’s Edge heating pad from William’s Brewing and a fan to circulate the air in the fridge. I was a little skeptical at first since it is only 25 watts but it is more than adequate. I originally stuck it directly to the inside wall of the fridge but upon testing it got a little too warm and loosened the adhesion between the plastic wall and foam insulation of the fridge. The pad doesn’t get hot but definitely a little too warm for the thin plastic wall of my Sanyo mini fridge. The fridge was fine so I went about peeling it off without damaging the pad or the wall of the fridge. How it was time for some creative thinking to get the heating pad secured. Having it on the side wall of the fridge was perfect since it kept it out of the way and radiated warmth directly at any fermenter placed inside. I finally thought it needs some space between it and the side wall, but how? Why not mount it to something and then mount that to the wall? Bingo! I got a piece of 1/16″ thick sheet aluminum that was slightly larger than the heating pad for next to nothing and decided to mount the aluminum plate to the wall of the fridge with spacers holding it a little off the wall. My first thought was drill through the side wall of the fridge but most of these mini fridges have refrigerant lines running through the side wall and one small mistake and I ruin the fridge. There is a ton of info regarding where to drill in the top of these refrigerators for converting them to kegerators but no info about drilling through the side wall other than tales of failed attempts. Well after a lot of unsuccessful research I dismissed that idea and decided to epoxy the nylon threaded spacers to the side wall of the fridge. First attempt failed because the plastic side wall is slick and epoxy wouldn’t hold. I got out the sand paper and roughened up both the spacer and fridge wall and success! Very strong bond and my careful placement resulted in the holes actually lining up with the holes I drilled in the aluminum plate. Fortunately the back of the heating pad was still sticky enough to attach to the aluminum plate and all is well.
After connecting up to the controller I built the first test run was great, I am able to hold temperature in the fermentation fridge to within .5 degrees celsius of set point. The STC-1000 controller is great since it will heat or cool and has a compressor time delay when cooling to prevent wear on the compressor while still maintaining a tight temperature differential. Building this rather simple fermentation chamber is probably one of the best things I’ve done for my brewing. The fermentation chamber is made from the Sanyo 4910 mini fridge and fits a 6.5 gallon bucket, 6 gallon carboy or the tall 1/4 and 1/6 barrel Sanke kegs which are my choice for a fermenter.
Cheers


